Discover all the formats available to download your documents from Transkribus and store, publish or further analyse your transcriptions
If you want to work with your images and transcriptions outside of Transkribus, you can download your documents from the platform. Transkribus offers a variety of export options to fit your project's needs, allowing you to choose from different file formats and structures.
Below, we outline the steps and options available for exporting your work, depending on your subscription plan.

Standard export options (available with all subscription plans)
- Images: Export pages as image files (JPEG).
- Docx files: Export documents as Microsoft Word files.
- Transkribus PDF: Export documents as PDFs with embedded text.
- Text Files (TXT): Export the transcribed text as .txt files.
- Page XML: Export Page XML files for further technical use or analysis. It is an XML-based framework that captures image characteristics, layout structure, and page content in an XML file for each page. The complete format definition for Transkribus can be found here.
Advanced export option (available with Scholar and Organisation plans)
- Export Structural Elements to Mets: A METS (Metadata Encoding and Transmission Standard) file is a digital container holding all the essential background information about a specific file. For more in-depth insights please visit the METS page.
Additional Export Options (dependent on your plan)
- PDF Document: When exporting a document as a PDF, you can select how your images and text will be included in the final PDF file. Here are the options you can choose from:
-
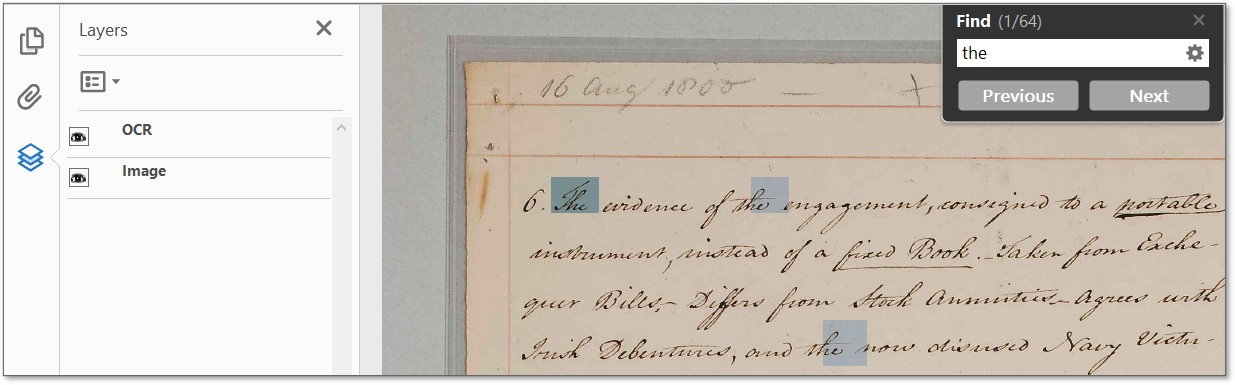
Image plus text layer:
This option embeds both the page images and the transcribed text layer into the PDF. The text layer is searchable, and the term you are looking for will be highlighted (please note that the highlighted area may not perfectly match the word in the image because the word coordinates are determined from the lines with a certain degree of fuzziness).
-
-
-
Images only:
Select this option if you prefer having a PDF containing only the images of your document pages, without any overlaying text layer.
-
-
-
Extra text pages:
Opting for extra text pages will include an additional page in your PDF for each original page, containing only the transcribed text.
-
-
-
Highlight tags:
If your document includes tagged text (for example, names, places, or specific annotations), you can choose to highlight these tags in the PDF.
-
-
-
Highlight articles:
For documents that contain structured articles or sections, this option allows you to visually highlight the boundaries and titles of each article within the PDF.
-
- DOCX Document: Export to Microsoft Word format for editing purposes.
-
Preserve line breaks:
This option maintains the original line breaks found in the transcription, making the DOCX file closely resemble the layout of the transcribed document.
-
-
-
Force page breaks:
Selecting this will insert a page break in the DOCX file at the end of each page in the Transkribus document. This ensures that the start of a new page in the transcription corresponds to a new page in the Word document.
-
-
-
Mark unclear words:
If your transcription includes words tagged as "unclear" (often due to poor source image quality or illegible handwriting), this option allows you to highlight or mark these unclear words in the exported DOCX document.
-
-
-
Write image name before text:
When enabled, this feature adds the name of the image file associated with each page of the transcription at the beginning of the corresponding text in the DOCX document.
-
- Spreadsheet (Excel/CSV): Exporting metadata or transcribed text to a spreadsheet for data analysis offers three options: Table Export, Tag Export, and Page Metadata.
-
- Table export:
This option is designed for exporting transcribed data that has been structured as tables within your documents. It allows for further customisation of how your tabular data is presented in the exported spreadsheet:- Merge into one table:
This option combines data from all selected tables across your documents into a single table within the spreadsheet. - Export single column with image snippets:
By choosing this, the exported spreadsheet will include a single column containing image snippets of the table cells, in addition to the transcribed text. This visual representation can be particularly helpful for quick data verification or when the information's visual context is important.
- Merge into one table:
- Table export:
-
- Tag export:
If you've used tags to mark specific elements (e.g., names, dates, places) within your transcription, this export type allows you to compile all tagged elements into a spreadsheet, facilitating easy access and analysis of specific data points. - Page metadata:
Choose this option to export metadata associated with each page of your documents, such as page numbers, titles, or any custom metadata you've added.
- Tag export:
- ALTO XML: Export in ALTO XML format, often used for digital library collections.
You can split the line into words as a special export detail here.
ALTO is a specialised format that allows you to export your document for use in other programs. When selecting this format, you will receive an XML file for each page, containing both the content and layout information. It is commonly used alongside METS to describe the entire digitized object and establish connections between ALTO files, such as sequencing information. For more details, please visit ALTO. - TEI XML: Export in TEI XML format, suitable for academic research and digital humanities projects. You have a choice between two stylesheet options, each catering to different project requirements:
-
Standard:
This option refers to Transkribus's default TEI XML export format. It is designed to provide broad compatibility with TEI guidelines, ensuring that your exported document adheres to widely accepted standards for encoding textual data.
-
-
- Page2tei:
Choosing the page2tei option allows you to export your document using a specific XSL transformation, created by Dario Kampkaspar. This transformation is available on GitHub: page2tei.
This option is particularly useful for those requiring a more customised or detailed approach to TEI XML encoding. With Page2TEI, you will download a TEI XML file that is specifically structured according to the guidelines and enhancements provided by the Page2TEI XSL transformation. This can include more detailed representations of page layouts, specialized tagging, and other features that are not covered by the standard TEI XML export.
- Page2tei:
Expand Tag Settings
Some export options include an additional "Expand tag settings" section, providing further customisation for tag exports.
- No tags: Choose this option if you do not wish to include any tag information in your exported document.
- Export all tags in document: This will include all tags present in your document.
- Export only selected tags: If you only want specific tags to be included and highlighted in your document, select this option. You'll need to specify which tags are to be exported in a separate tag selection window.
Accessing exported files
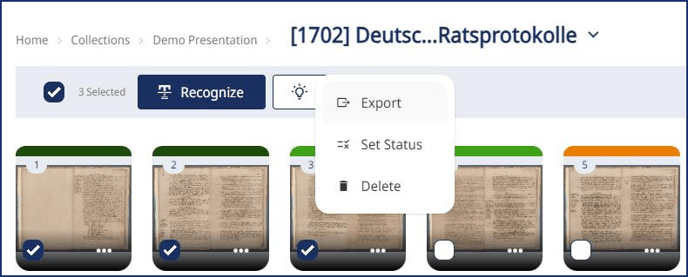
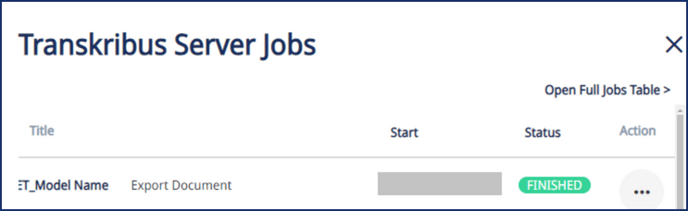
Once you initiate the export task, your download job will be processed on the Transkribus server. You'll receive an email with a link to download your files, which will be valid for two weeks. To track the download progress, simply check the status using the Jobs button.
Additionally, in the jobs overview table, you can conveniently access the download file by simply clicking on the three dots located in the Action column on the far right and selecting the Download option.
Transkribus eXpert (deprecated)
If you want to work with your images and transcriptions outside of Transkribus, you can export your documents from the platform. Different export formats and features are available to suit your needs.
To open the Export window, click on the folder icon with the green arrow pointing to the right in the Main Bar:

The Export document that opens up has two tabs/options between which you have to choose:
- Server export: the export will be processed on the Transkribus server, and you will receive a link to download your files. The export will not slow your computer down, and the process will not be interrupted if you switch your computer off. After starting the download, you can check the progress of your export by clicking the “Jobs” button in the “Server” tab.
- Client export: the files will be saved directly to your computer. Please choose where you would like to save the exported files: type the file location in the “Base folder” box at the top of the window.
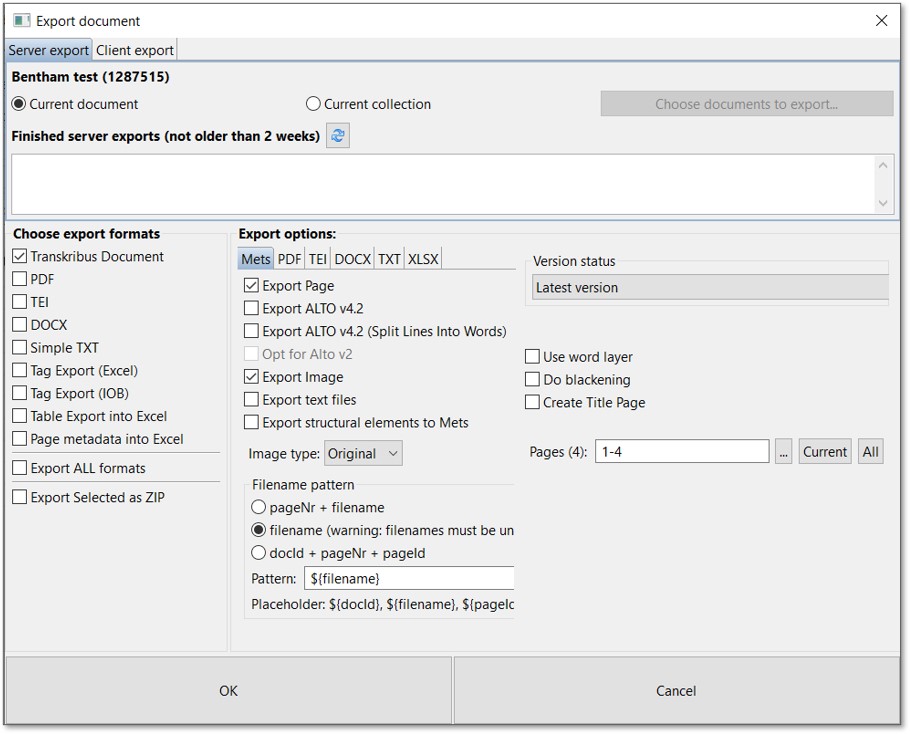
These are the available export formats:
- Transkribus Document: if you export your transcription as a Transkribus Document, you will produce a METS (Metadata Encoding and Transmission Standard) file containing the links to PAGE, XMLs, ALTO and/or image files, depending on which options you choose.
A METS file is like a container which includes all the background information about a file. More detailed information about METS can be found at: http://www.loc.gov/standards/mets/
In conjunction with the METS file, you can export your document in these formats:-
- PAGE: is an XML-based page image representation framework that records information on image characteristics in addition to layout structure and page content.The complete format definition used in Transkribus can be accessed here.
- ALTO: is a special output format which allows you to input the exported document into other programs working with this format. The format is similar to XML and works for OCR, for example. It is often used in combination with METS for the description of the whole digitized object and the creation of references across the ALTO files, e.g. description of the reading sequence.
More information about ALTO can be found at: http://www.loc.gov/standards/alto/ With the “Split Lines Into Words” option Transkribus will divide the lines into words. The program does this by analysing the spaces between words, even if no word segmentation has been performed previously. - Images: choose this option to download the image file of each page of the document/the selected pages.
In Image type, you can choose to download the Original (the image you uploaded) or the JPEG compressed version of the image (the one you see in the Transkribus Image Window).
Under “Filename pattern”, you can choose how the filename will be composed. The second option, “filename”, is the standard one. With this option, the exported file will have the same name as the document you imported. This is important if you want to match local transcripts with the images in Transkribus. So if you export a document, then adjust it externally, and after that upload it to Transkribus again, the program will need to have two similar filenames in order to recognise the file properly.
- PAGE: is an XML-based page image representation framework that records information on image characteristics in addition to layout structure and page content.The complete format definition used in Transkribus can be accessed here.
-
- PDF: when you export a PDF file, you can choose between these options:
-
- “Images plus text layer”: you will see two layers in the exported PDF document: OCR (the transcribed text) and image (image of the document).
- “Images only”: you will produce a PDF file with the document as an image. This means that you will not see the transcribed text.
- “Extra text page”: the transcribed text will be added to the PDF as an extra page after each image.
- “Highlight tags”: select these options to highlight the tags in the exported PDF file. The tags will be shown in the same colours used in Transkribus. At the end of the document, there will also be a symbol legend to explain the signification of the different colours.
- “Highlight article”: the articles will be highlighted with different colours in the exported PDF.
- “PDF/A”: for long-term preservation.
You can also choose the font and image type to use in the PDF.
-
- TEI: this option is for people working with the Text Encoding Initiative (TEI). The Text Encoding Initiative is a text-centric community of practice in the academic field of digital humanities, operating continuously since the 1980s. More information at: http://www.tei-c.org/index.xml
You can choose to create the TEI XML file using the the XLS from Dario Kampaskar (available here: https://github.com/dariok/page2tei) or the “Client Export” format. You can try both and decide which one best suits your needs.
With the “Client Export” format, you can flag the option to export the predefined tags and attributes only: it creates a valid TEI but note that all the tags and attributes created by you will be ignored.
Transkribus enables you to choose the zones you need (no zones; zone per region; zone per line; zone per word). Furthermore, you can choose between line tags and line breaks to tag lines. - DOCX: by choosing this option, you will get your transcriptions in Word files. You can select options relating to line breaks, abbreviations and more according to your needs.
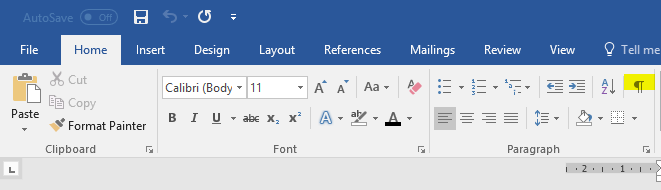
Select “Export selected tags” to make the tags visible in the exported DOCX file. After the export of the Word document, please open it and do the following:- Click on the paragraph button in the Home menu of Word
- Go to “References” and choose “Insert Index”
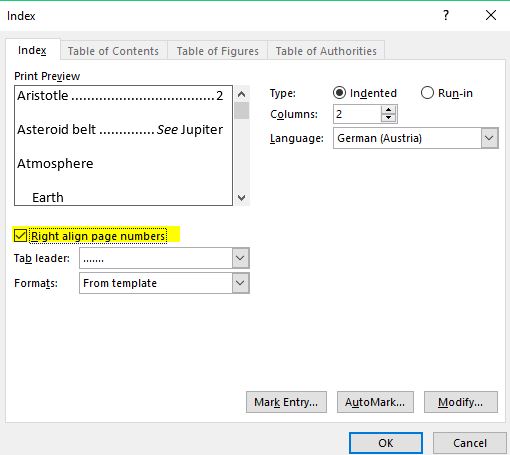
- The following Office window will open up
- Select “Right align page numbers” and press “OK”
- A confirmation window will pop up: click “Yes”
- An overview of the tags should now appear at the end of the document. If the overview of the tags does not appear, click “Update Index”. This should solve the problem.
- Click on the paragraph button in the Home menu of Word
- TXT: if you do not usually work with Microsoft Word, it is possible to export your transcription as a simple TXT file.
You can choose to split the text into text files from a start tag to an end tag and create several text files; those files can be named according to one or more attributes of the tag. - Tag Export (Excel): If you would like to export the tags you assigned to your transcription, select this option to produce an Excel file with individual tabs for each tag category and one tab with an overview of all the tags.
As described above, you can also export the tags in PDF and DOCX files. - Table Export into Excel: if your document presents tables, use this option to export them in Excel format. Each table will be exported as a separate sheet of the Excel file. However, you can check the option “Create one large table” if you prefer to have all the tables of the selected pages in one table in one Excel sheet. You can also choose to export only one column of your table with the cells' image snippets.
- Page metadata into Excel: to export the page-related metadata in the Metadata-page tab in the Excel format.


In addition to the export format, these options are selectable during the export:
- Version Status: to export a particular version of the document. If you select “Ground Truth”, for example, Transkribus will export only those pages of the document which you have marked as “Ground Truth.”
For the export, the program consults previous versions of your document. This means that if you choose to export all “In Progress” pages, the program will export all pages which have been marked as “In Progress”, even if their status is now updated. The program will export the latest “In Progress” version of your document. If you would like to export a specific former “In Progress” version of your page, open this version of the page in Transkribus. Open the Export window and select “Loaded version for current page” (available only for the Client Export). In the “Pages” option, select “Current” before confirming. - Word Layer: if checked, the text from word layer segmentation will be exported (it works only if you have previously selected the “Add estimated word coordinates” during the Text Recognition).
- Blackening: If you have blacked out sensitive sections of your transcription, these words or phrases can also be hidden in the exported files. To do this, select “Do blackening” in the export options. Note: this option only works for Word, PDF and METS files.
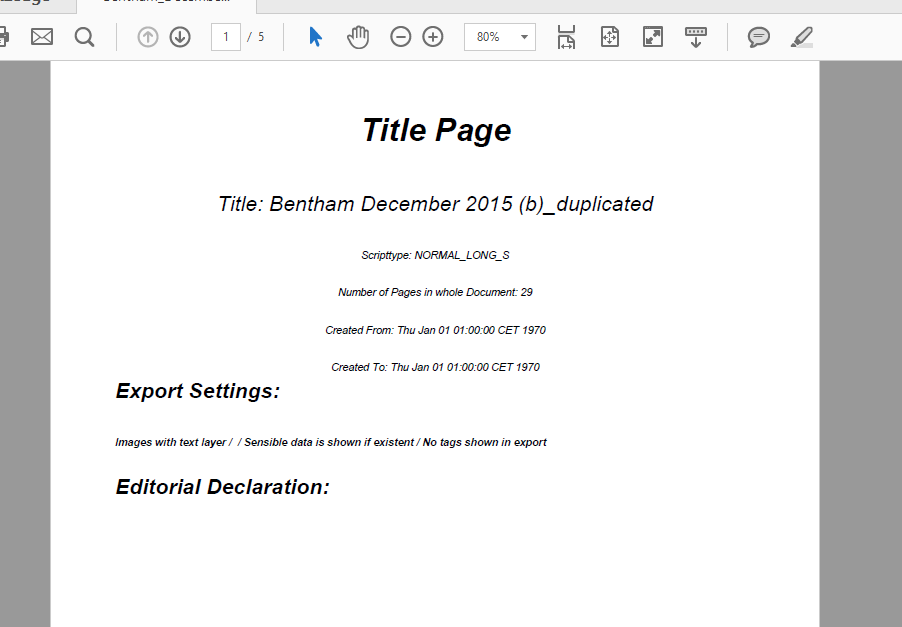
- Create Title Page: with this option, a title page based on the information added in the “Document” tab within the “Metadata” tab is created. In the “Document” tab, you can add information about the title, author, language and date of your document. You can also create an Editorial Declaration to explain how exactly your document has been transcribed (more info on the Editorial Declaration on this page).
- Pages to be exported: select the number of pages you wish to export. You can export all the pages in your document or just the current page.
- All tags/chosen tags: to choose which tags you want to export.