Use the feature-rich document editor to transcribe text from your images manually
Previous step: Layout Recognition
Within Transkribus, you can easily transcribe your documents with the image side by side.
There are various reasons why you might want to transcribe documents manually!
Whether you simply want to edit and process your documents, or you want to create accurate transcriptions to train a text model to automatically transcribe new pages, the Transkribus Document Editor is here to make it easier.
After uploading your documents, select the page(s) you want to transcribe and run the automatic Layout Recognition. Open the first page to be transcribed and start transcribing line by line the text you see in the image.
The automatic Layout Analysis aligns the lines in the image with the lines in the text editor, so while you are transcribing, the image is automatically centred on the line you are working on.
To move around in the transcribed text, press Enter on your keyboard to move to the following line or use the mouse or arrow keys to move the cursor up and down in the text.
Enrich your transcriptions with tags, as explained on the Textual Tags page, and download them in different formats (Docx, PDF, XML…), as described in the Downloading section.
Version History
It is important to save any changes you make to avoid losing your progress!
Transkribus automatically saves these changes as a new version of the page. You can easily track the different versions by clicking on the Version History icon, located in the top right corner of the Document Editor, resembling a clock.
Using the three-dot menu, you can switch between a read-only view for searching or editing a version, ensuring that you don't accidentally edit any page version.
Additionally, you have the option to delete a specific version if needed.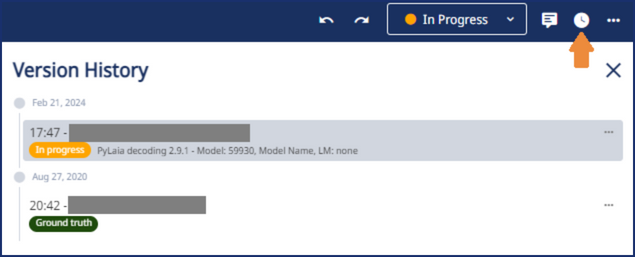
Modify the Document Editor
To make manual transcription easier, you have the option to customise the settings of the Document Editor to suit your individual needs.
Sidebar Text Editor
- increase/decrease the font size
- use the Virtual Keyboard to add special characters (to make the characters appear in the virtual keyboard, you need first to click on the Configuration button - Virtual Keyboard tab on the right side and add the special characters you need, as explained here)
- change the reading order, open the Layout Tree on the right side of the text editor, grab the line or text region, and then move and release it in the correct position.
- modify the image viewing settings and switch the text position (text beside or below the image)
- Open Settings to :
- disable/enable the option to centre the selected line automatically
- show line and region numbers
- change the viewing settings of regions and lines: change the label and circle size, the line width, the highlight height of the selected line, and the colour and transparency of both the lines and highlight
Sidebar Layout Editor
- add lines, regions or tables to your image
- increase/decrease the image size
Next step: Training Text Recognition Models
Transkribus eXpert (deprecated)
The Transkribus interface also facilitates the manual transcription of documents. With the text editor, you can easily transcribe your documents with the image side by side.
The automatic Layout Analysis creates a correspondence between the lines in the image and the lines in the text editor, so while you are transcribing, the image is automatically centred on the line you are working on.
You can also enrich your transcriptions with tags, as explained on the Textual Tags page, and download them in different formats (Docx, PDF, TEI, XML…), as illustrated in the Downloading section.
There are various reasons why you might want to transcribe documents manually. One of them is the creation of accurate transcriptions to train a Text Model to transcribe new pages automatically.
After uploading your documents, select the page(s) you want to transcribe and the automatic Layout Recognition. Open the first page to transcribe and start transcribing line by line the text in the text editor.
To facilitate the manual transcription, remember that you can:
- enable the Transcription mode with the “Profiles” button in the Main Menu;
- change the position of the text editor (text and image side by side) with the “Change position of transcription widget” button in the Formatting Bar;
- change the font and font size of the text by clicking on “Transcription settings” in the Formatting Bar;
- modify the image viewing settings with Main Menu;
- use the virtual keyboard in the Formatting Bar to add special characters (you can customise the special characters of the virtual keyboard: select the tag “Custom” and then click “Edit”);
- press Enter to move to the next line, and use the arrow keys to move up and down in the text.
If you need to change the reading order, open the “Layout” tab in the Managing&Tools Bar: the line you are editing is highlighted. Within the layout tree, move the highlighted line to the correct position. By clicking the "R" button, you can reorder all the lines of an element according to their coordinates.
Another way is to enable the display of the line reading order in the image window: to do so, click on the “Shape visibility” button in the Main Menu. At the beginning of each line, the reading order value will appear; double-click on the value to change it.