Trainable table models utilize AI to identify the tabular layout of your historical documents, simplifying data extraction and export into spreadsheets
Available on Beta
Previous step: Manual Layout Recognition
When dealing with tables in your document, the appropriate approach in Transkribus depends on the frequency and layout of the tables:
- Tables that are consistently present throughout the entire volume or many pages and have the same or a similar tabular structure: train a table model, as described below.
- Tables that appear sporadically or are embedded in the text: draw them manually using the editor functions (just points 1-3 of Step 1 - Preparing the Training Data).
How to Train a Table Model
Step 1: Preparing the Training Data
Table Models are not an all-in-one or out-of-the-box solution. They are designed to be trained on a certain document or collection to recognise its specific table layout. However, with enough training data, table models can be trained to recognise a few different types of tables at once.
The Training Data you would need depends on the type of table(s). We recommend selecting a sample from the entire volume/collection, not just the first pages, to have more variety and train a more robust model:
- easy tables: 20 pages of Ground Truth
- difficult tables (uneven rows, skewed tables, two or more tables per page, a table across two slightly off-set pages...): 50 pages of Ground Truth
- mix of different tables: between 50 and 100 pages of Ground Truth, depending on the number of tables
Table models can be trained even when the separators (that define the columns and rows) are not visible and when the height of the rows varies. However, they may encounter difficulties with very narrow rows and columns, which increases the likelihood of them being overlooked. Table models can also deal with skewed tables as long as the skewness is not excessive.
After choosing the pages to use as the Training Data, draw the tables manually following these steps:
-
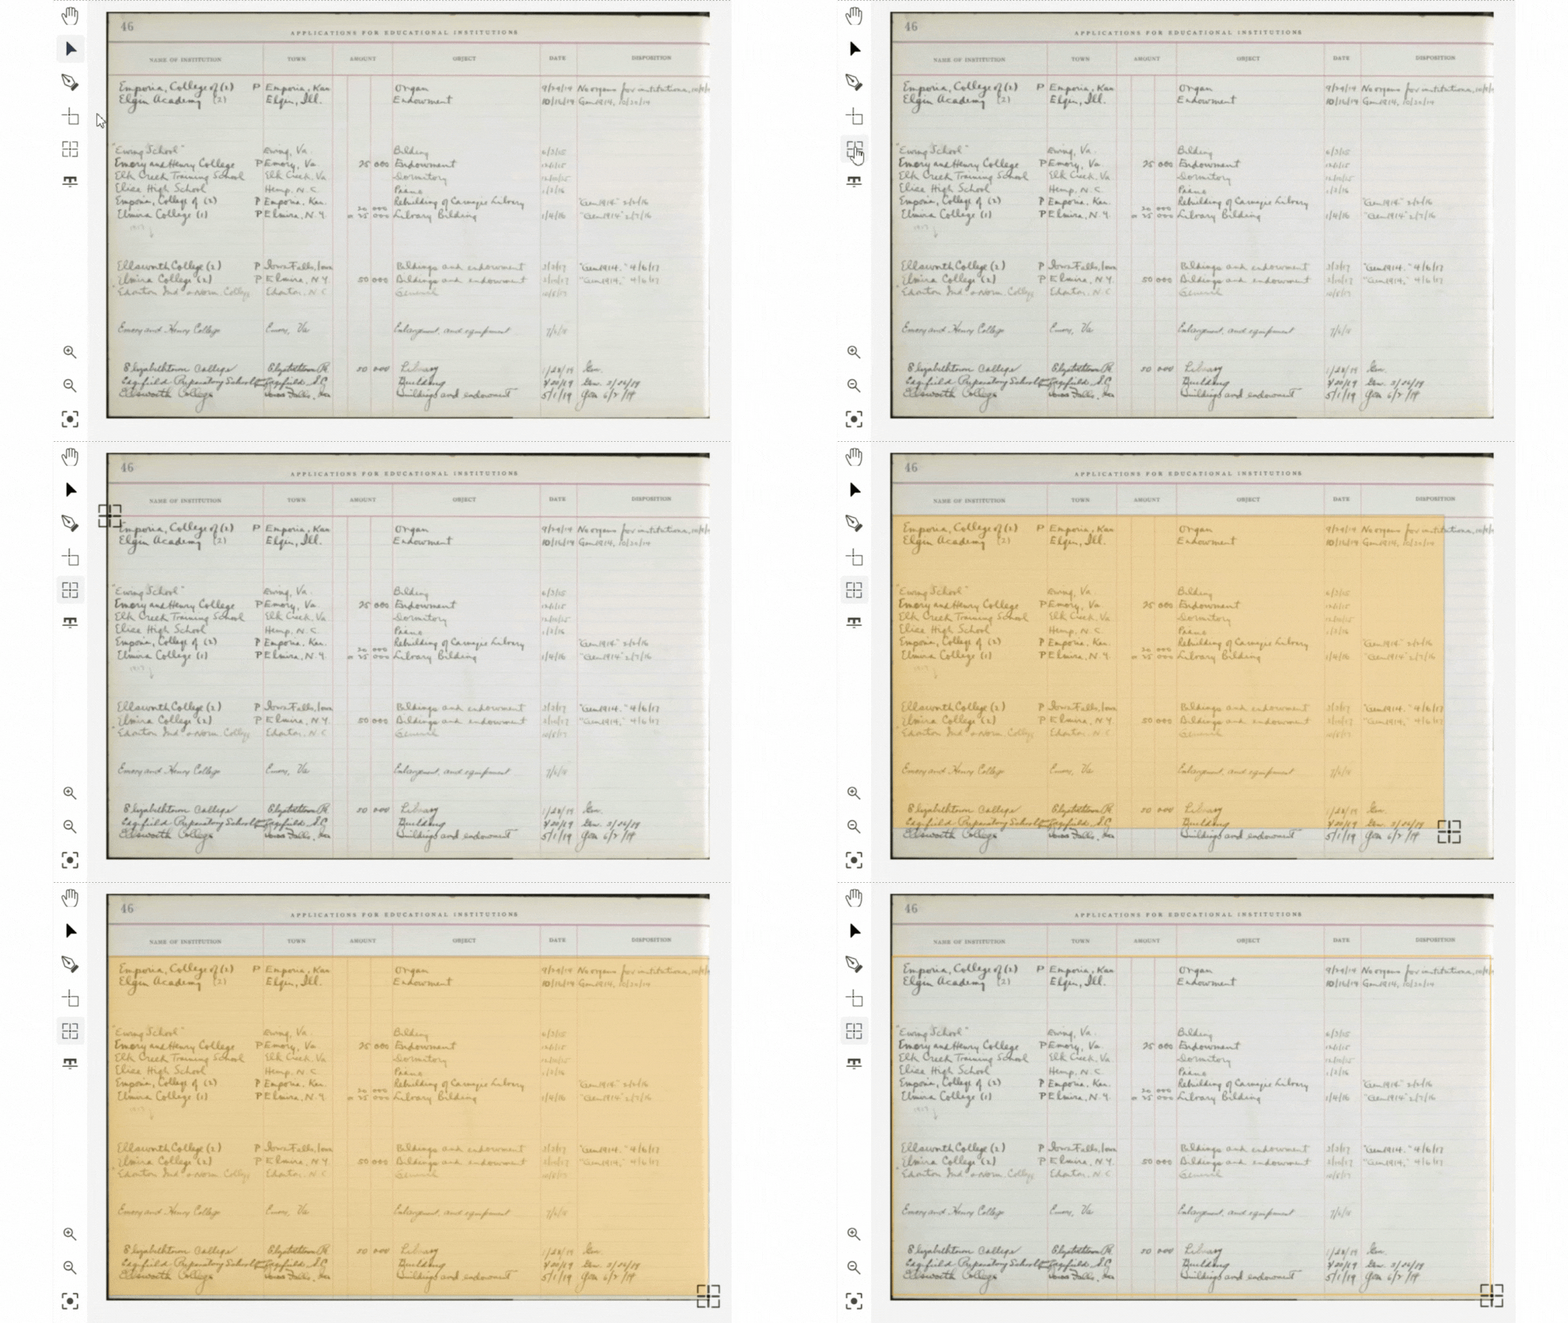
In the Transkribus editor, select the "Add a Table" button on the left-side menu. Click on the image once to start the table and once to finish it.

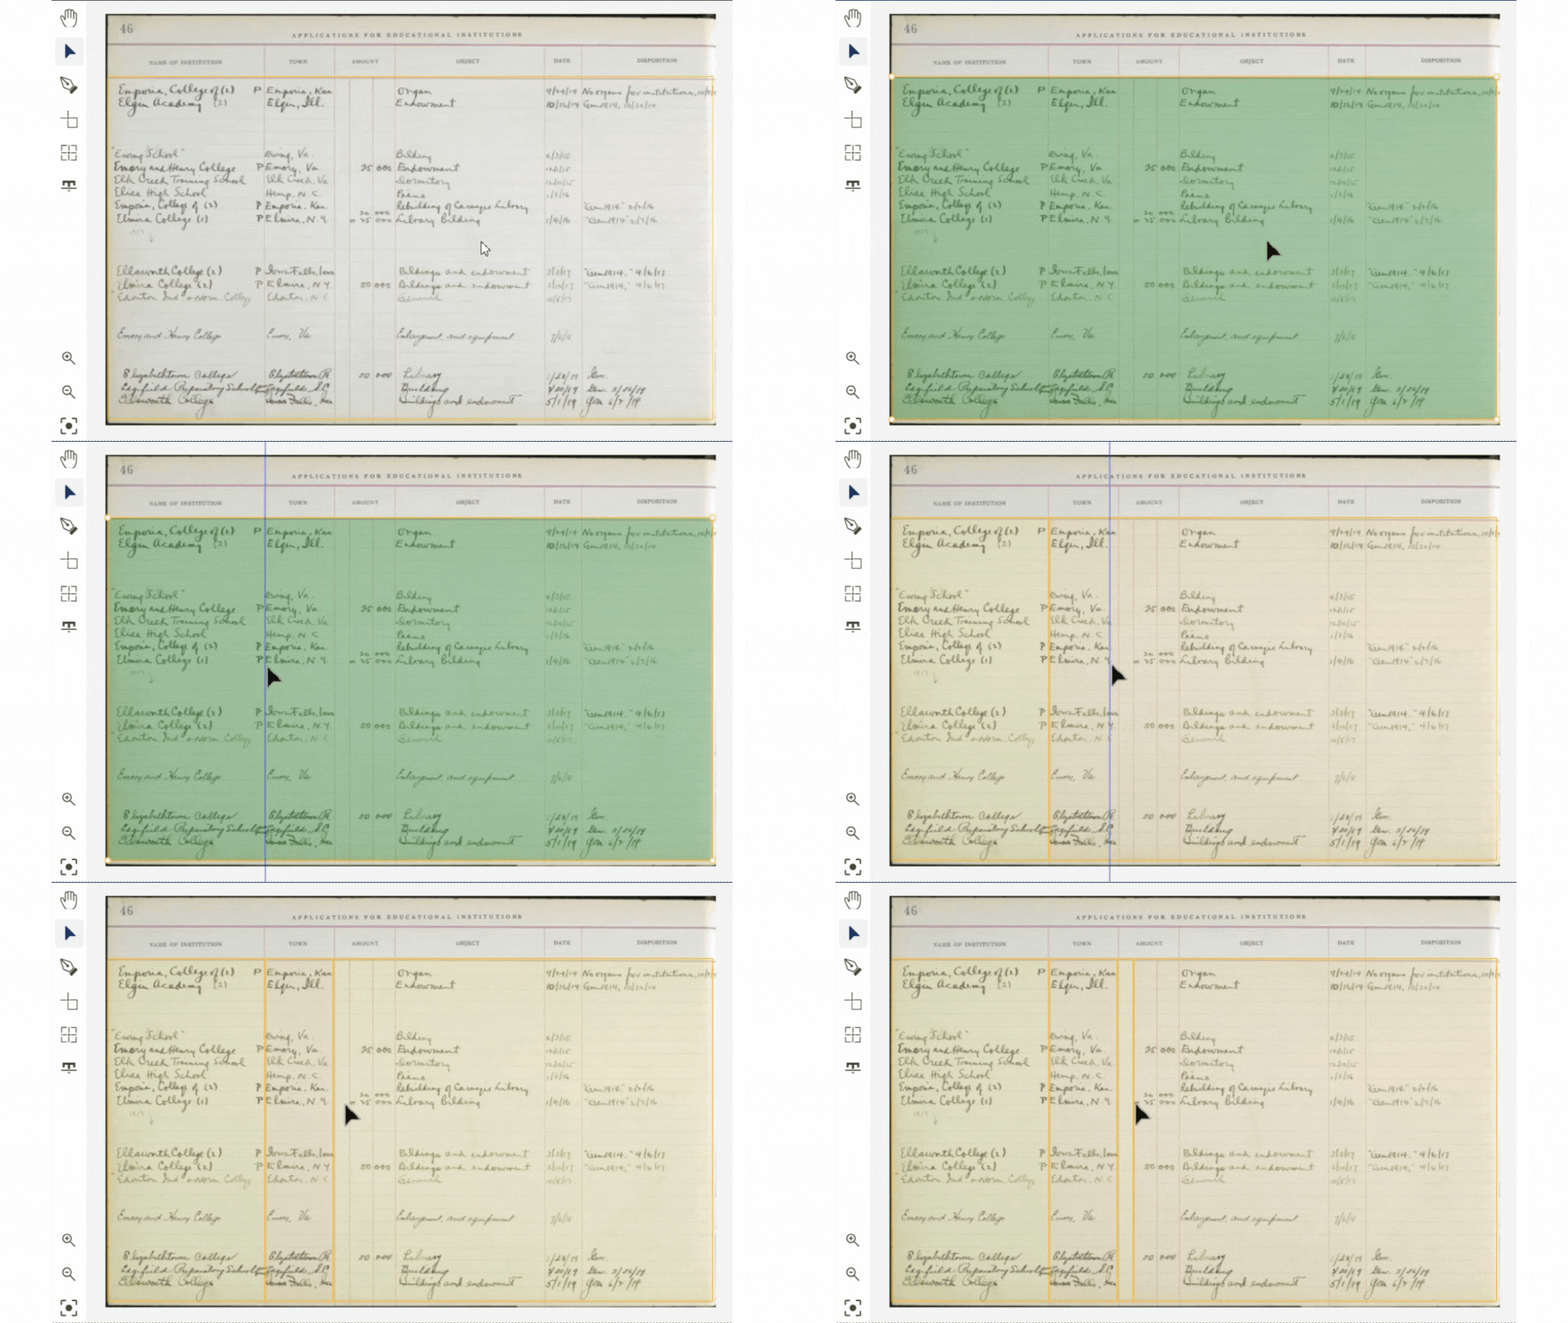
- To create columns, select the table and hold V while moving the cursor across the page and clicking wherever you want to create a column.

- To create rows, select the table and hold H while moving the cursor across the page and clicking wherever you want to create a row. Keep going until all the cells are marked.
.gif?width=688&height=387&name=Draw%20columns%20(3).gif)
- Save the page as Ground Truth and move to the next one.
Good to know tips:
- To draw columns and rows with a custom angle, select the table, hold C and use the arrow keys to change the angle.
Hold C+CTRL and use arrow keys to draw more precise angles. - If the table layout of several pages is similar, you have the option to copy and paste the table structure from one page to the others. Simply select the table, press CTRL+C, navigate to the next page, and press CTRL+V. Remember then to adjust the table to fit the image.
We recommend performing this task after drawing the columns but before drawing the rows, as the rows tend to vary more from one page to another and adjusting them manually may take more time. - Table models can be trained to ignore specific columns, consider multiple columns as one column, or even create columns/rows when they are only separated by white space and there are no visible separators. Consistency in creating the Ground Truth and including a sufficient number of pages, covering all the different cases that the model needs to recognise, is crucial.
Step 2: Training the Table Model
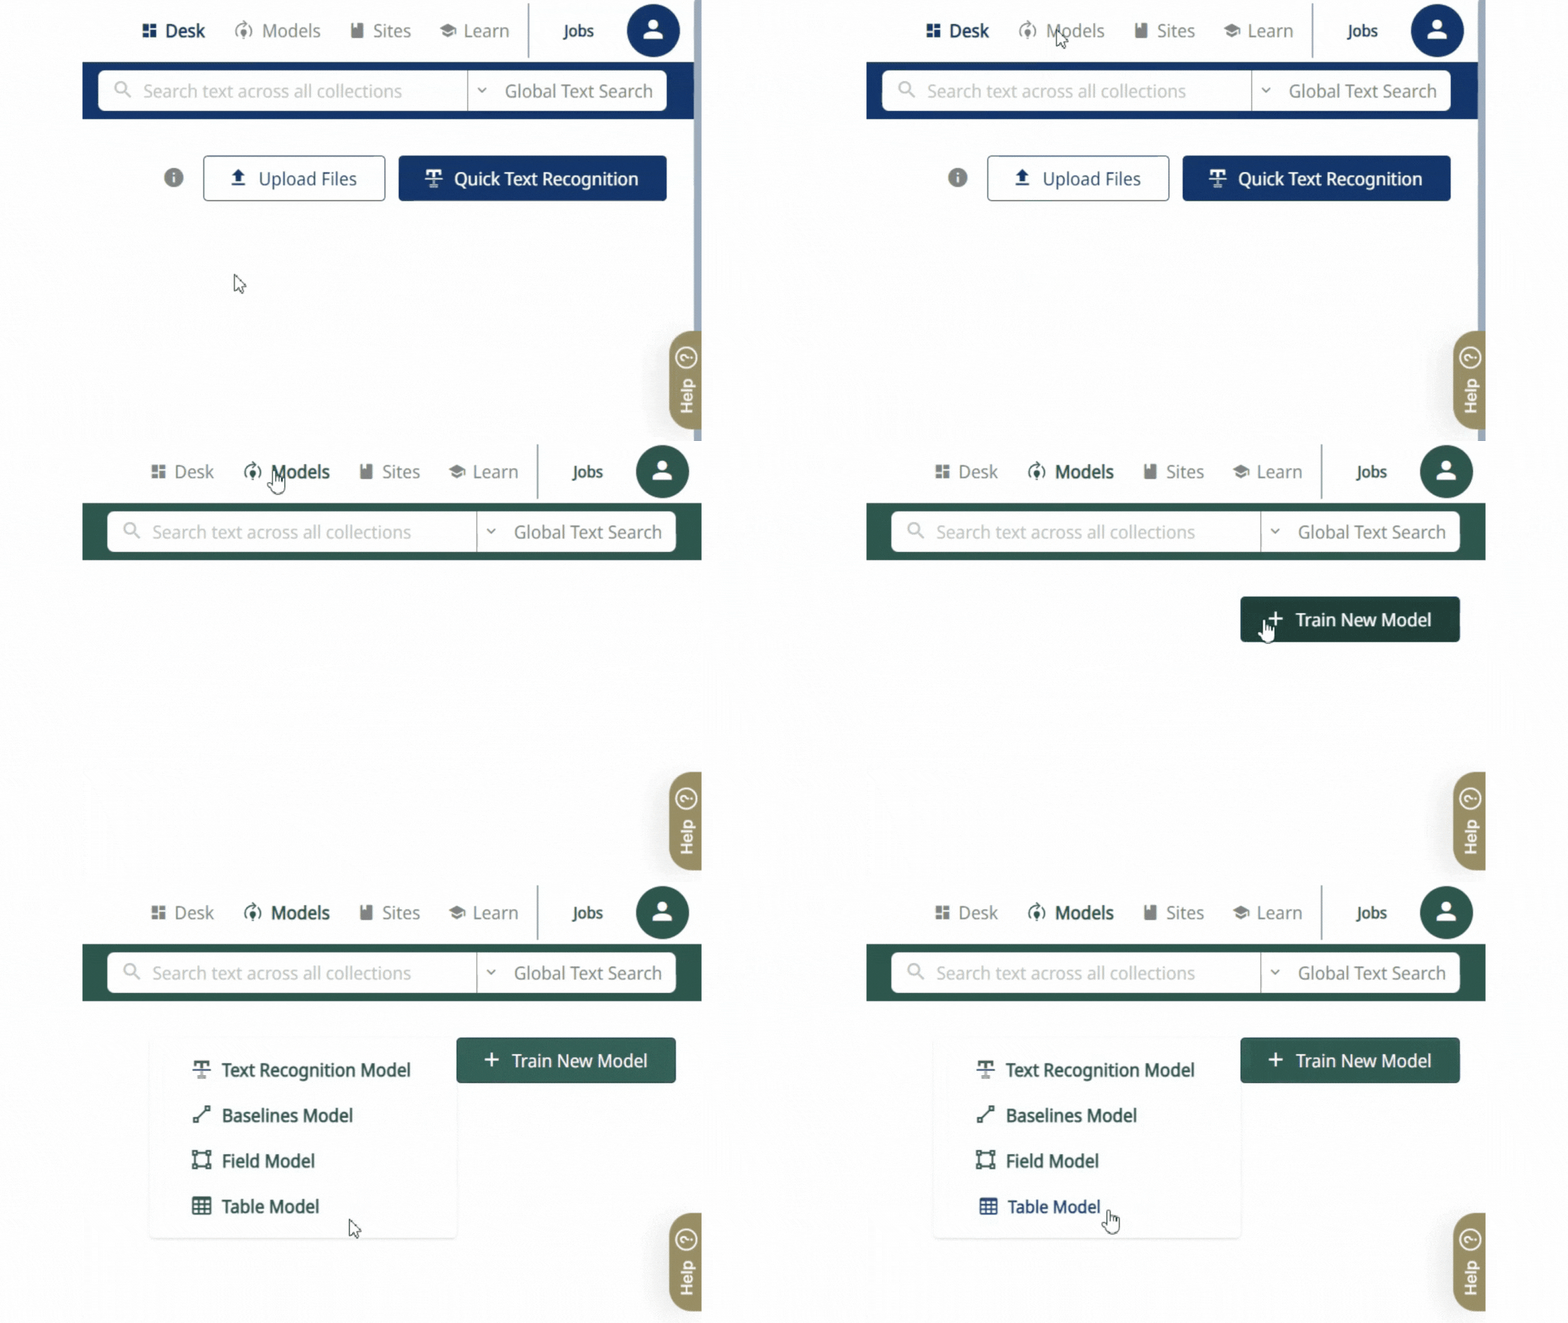
- Navigate to the Model tab in the upper right corner, click "Train a New Model", and select "Table Model."

- Choose the collection containing your Training Data.
- Select the Training Data: select the specific documents or pages where you have drawn the tables and that you want to use to train your Table Model. You have the option to use the Latest Transcriptions or only the documents and pages saved as Ground Truth.
- Select the Validation Data: by default, Transkribus selects 10% of your dataset as validation data. We recommend sticking with this, but you also have the option to manually set specific pages as your Validation Data.
- Model Setup: fill in the following fields:
- Model Name: give your model a name.
- Description: provide a brief description of what the model is for.
- Preview Thumbnail: optionally, you can add an image that will serve as a preview thumbnail for your model.
- Advanced Settings (optional):
For initial trainings, it is recommended not to modify these parameters and to adhere to the default advanced options, which have proven to be effective in most scenarios.
- Training Cycles (5000 by default; should be between 1000 and 10000):
the training cycles indicate how many times the model will go through the training data to learn and adjust. More cycles could result in a more accurate model but may also risk overfitting. - Learning Rate (0,0001 by default; should be between 0.0001 and 0.05):
the learning rate affects how quickly the model adapts to the data.
- Training Cycles (5000 by default; should be between 1000 and 10000):
- Review all the settings and data you have inputted. Once everything looks good, start the training process.
- Check the status of the training process via the "Jobs" button on the right side of the top menu bar. Click on "Open Full Jobs Table" to see the details of the job. If the job's status states "Created", you can see in the description how many trainings are in the queue before yours.
How to Use the Trained Table Model
Step 1: Selecting Documents for Recognition
After your Table Model has been trained, go to your Transkribus Desk and select the documents or specific pages you want to recognise.
Step 2: Table Recognition Process
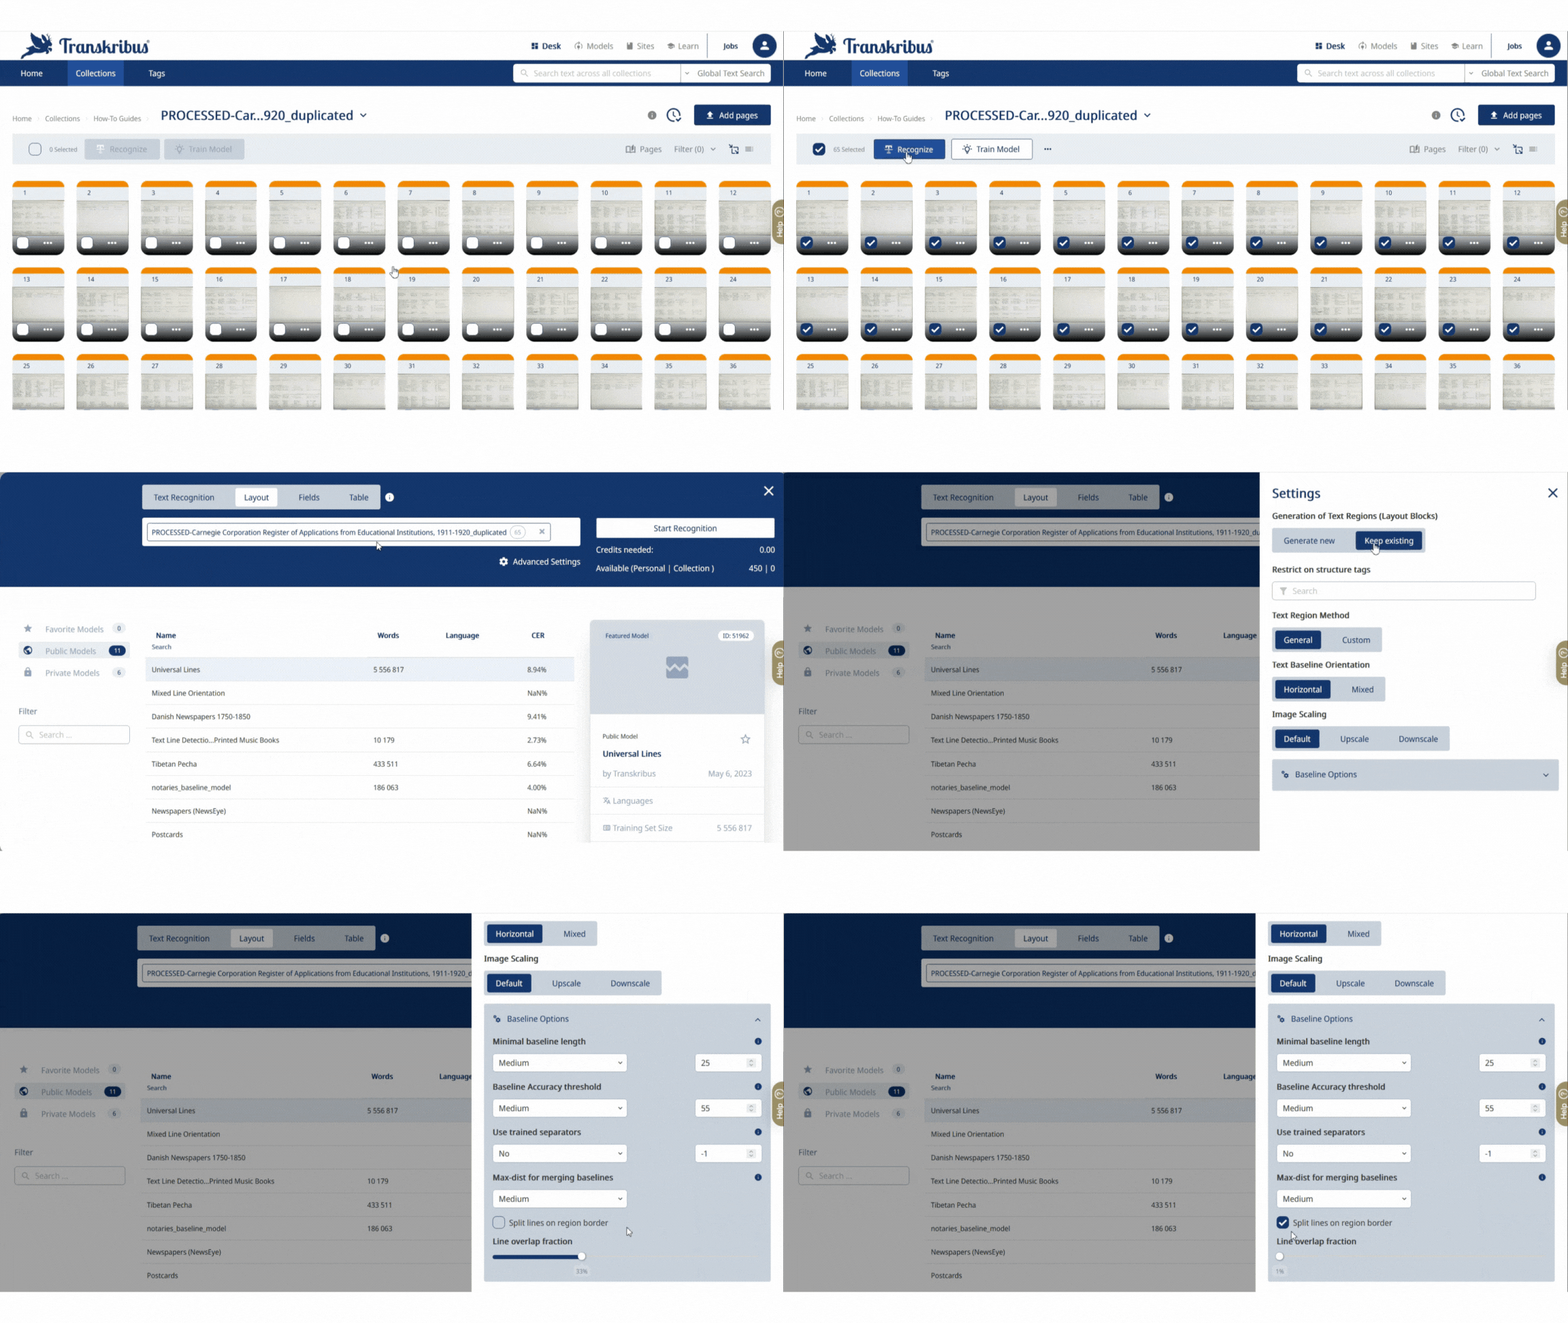
- Click on the "Recognise" button.
- Go to the top of the recognition section and choose "Table."
- Under your private models, find and select your newly trained Table Model.
- Start the Recognition.
.gif?width=484&height=272&name=Table%20model%20recognition%20(1).gif)
Step 3: Layout (Baselines) Recognition
Once you have recognised the table structure on all the pages, run the Automatic Layout Recognition to automatically add baselines.
Rember to use these Advanced Settings:
- "Keep existing" text regions: to detect only the baselines inside the already recognised tables.
- "Split lines on region borders": to make the baselines strictly obey the cell border and prevent close lines belonging to different cells from being merged together.

Additional adjustments to the advanced layout parameters might be required, depending on the specific documents. For a comprehensive overview of all the advanced layout configuration settings, please refer to this page.
If it happens that lines stretching multiple cells are divided, you can merge those partial lines. First, you must move them to the same cell: open the layout tree with the "Layout" button on the right-side menu and select, in the image, the line that belongs to the wrong cell: automatically, it will highlight the corresponding line in the layout window. Within the window, move the highlighted line to the right cell (probably the previous or following cell). Now that both the lines belong to the same cell, you can hold CTRL, select both lines and press M on your keyboard to merge them.
Step 4: Text Recognition
Apply the most appropriate Text Model to automatically transcribe the content of your tables, as explained on this page.
Transkribus eXpert (deprecated)
Segmenting printed or hand-drawn tables using the Table Editor in Transkribus will add graphical lines to your image and assign a tabular structure to the layout of your documents.
Currently, tables must be manually drawn using the Table Editor in Transkribus. But if multiple pages follow the same table template, the table markup can be done on the first page and then copied to the remaining pages.
First, create text regions for any information not belonging to the table.
This refers to information at the top, bottom or sides of the page which is clearly not part of the table, such as page numbers, line numbers, dates and any other markings or annotations.
Then, you can create the table. In the Canvas Menu, select the "Add other item" button and then click "Add a table." Click on the top left corner of the table in the image and then click on the bottom right corner
You can now segment your table into rows and columns. To begin, make sure you are in "Selection mode:" press the "ESC" key on your keyboard or click the "Selection mode" button in the Main Menu. Click on the table that you have created.
To create rows, click the H-button in the Canvas Menu: move your cursor across the page and click wherever you want to create a horizontal line.
To create columns, click the V-button in the Canvas Menu: move your cursor across the page and click wherever you want to create a vertical line. Continue until all table cells are marked.
In some cases, it may be necessary to merge cells together in order to reflect cells spanning multiple rows or columns. To select cells to merge, hold down the "CTRL/CMD" key on your keyboard, click on the relevant cells in your table and then click the "Merges the selected shapes" button in the Canvas Menu.
If you focus on having the perfect table segmentation, correcting the shapes of some of the cells in your table may also be necessary. The segmented green lines should then correspond to the lines of your table as far as possible. In order to do so, select the table cell you wish to edit, click and drag the green dots to move the position of the lines.
Depending on the layout of your table, you might want to treat the spine of the book like an extra column. You can also mark up this column on the table cell level using the "book-binding" tag in the "Metadata/Structural" tab.
If the table layout of several pages is similar, it is possible to transfer the table format from one page to others. To do this, open "Other segmentation tools" in the Canvas Menu; choose "Copy regions (texts or tables) to other pages;" define the pages the layout should be copied to in the appearing window and confirm with "OK". The table layout will be copied to the indicated pages. To definitely run the tool, unselect "Dry run". It might be that the position of the table on the new pages will need to be correct. To do so, select the whole table and then move it by holding the CTRL + SHIFT on your keyboard.
Before manually or automatically transcribing the table, the next step is adding baselines. The baselines should reflect the logical flow of text and can therefore run over the cell borders if necessary. You can either draw the baselines by hand or use the automatic Layout Analysis tool.
You may find that the automatic layout tool on table cells strictly obeys the cell borders. Baselines stretching multiple cells are divided. You can use the merging tool to combine those partial baselines. In case you want to merge baselines stretching more than one cell, you need to move them first to the same cell, select them and use the merging tool. In more detail, open the "Layout" tab in the Tools&Managing Bar, and select, in the image, the line that belongs to the wrong cell: automatically, it will highlight the corresponding line in the layout tree. Within the layout tree, move the highlighted line to the right cell (probably the previous or following cell). Now that both the lines belong to the same cell, you can select both and click the "Merges the selected shapes" button in the Canvas Menu.
