Mark-up words, such as names, dates, places, and events, with textual tags to add information to your transcriptions
Previous step: Automatically transcribing your documents
Textual tags are an effective way to enhance your transcriptions by tagging specific words like abbreviations, places, and people, and adding additional attributes. These tags can also help in identifying uncertain words in your transcription, and you have the flexibility to export all or selected tags.
Textual tags are centrally managed at the collection level, making it easy for all collaborators within the collection to edit and utilise them.
Step 1:
To add textual tags after you have automatically transcribed, or while manually transcribing a document, open the page and highlight the word(s) to tag in the text editor. The tagging window opens up: here, you can select the relevant tag and add its attributes, if necessary.
To choose which tags you want to see in this tagging window, simply click on "Tag settings". You can enable or disable the tagging window completely by clicking on the Edit Tags icon located in the menu on the upper right side of the screen.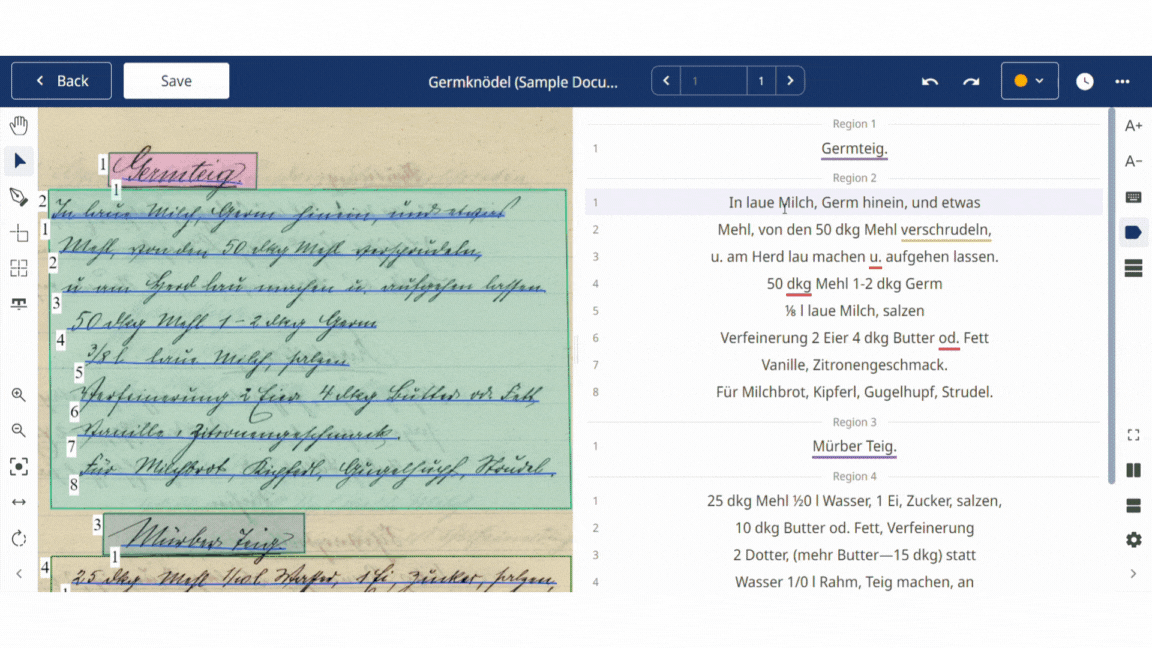
It is possible to easily add the Wikidata ID as a tag attribute. After selecting a tag, simply click on the Wikidata ID button and a suggested entity related to the selected word will appear. You can select it if it's correct or use the search bar to find the appropriate Wikidata term.
Step 2:
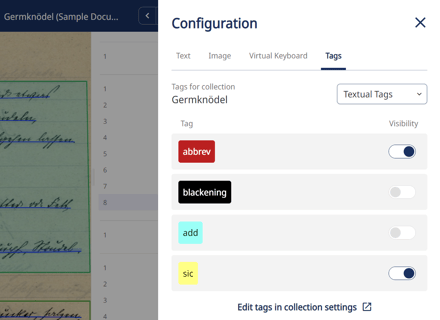
If you want to add and change customised tags or modify the attributes, click on the Settings icon located in the menu on the right side of the screen and go to "Tags". Here you can choose between "Structural tags" and "Textual tags" and switch tag visibility on or off by clicking on the buttons. To see the changes made you will have to reload your webpage.
To modify or add customised structural tags, simply click on "Edit tags in collection settings" and you will be redirected to the Tags page in the Transkribus Desk area. This is where you can make changes to all your tags.
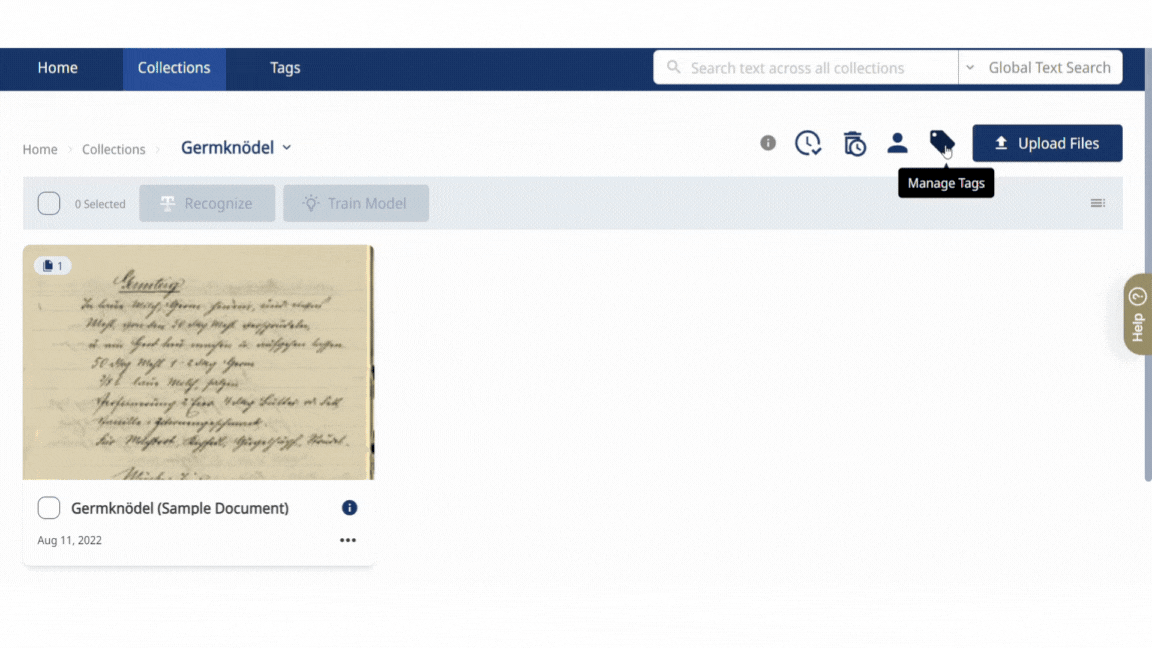
You can also manage the textual tags of an entire collection, simply open the collection and click on Manage Tags in the menu located at the top right corner, next to the "Upload Files" button. Then, select "Textual Tags" at the top. Here, you can add, edit, and remove textual tags and their attributes.
To add a new tag, click on “Create new”, type the name, choose the colour and possible attributes and click “Create” to save your changes. Reload your page to see the changes in the editor.
Click on the "edit" or "delete" button on the right side of the textual tags to modify your textual tags or to delete them by clicking on the "Remove tag" button.
When it comes to default tags, you have the option to delete them using the "Remove tag" button or to add new attributes to them. However, it's important to note that you cannot delete the existing attributes.
Attributes provide information about the content of the tag and can be used to extract and process data from the transcription. For example, the date tag allows you to tag a date written in the document and add properties such as the day, month, and year in a standardised format. It's worth mentioning that not all tags require attributes, it depends on your specific needs.
Please be aware that any changes made here will be saved for the specific collection that is currently open in the background. However, other users of the collection will be able to see and utilise any new or edited textual tags that you have added.
Step 3:
In the tagging window, you can also modify the text styles by adding bold, strikethrough, underline, subscript, and superscript to your text. When you apply one of these styles to a word, you will see the word change in appearance, but in the background, Transkribus adds a textual tag to that word to indicate the text style.
When working with historical documents, it is important to tailor the selection of textual tags to your specific needs. In general, certain tags are particularly useful in this context.
- Abbreviation
You can tag the abbreviated word and type the expansion as an attribute.
There is no right way to deal with abbreviations. Depending on the transcription you want to have in the end, you can adopt one of these approaches: - Transcribe the expanded version of the abbreviation directly into the text editor (the neural networks are often able to learn to recognise and use expansions, especially if they appear frequently);
- Transcribe the abbreviation using the base characters most similar to the characters written by the writer; you can then tag it and write the expansion as an attribute;
- Transcribe the abbreviation using the Unicode characters which are near to the special graphemes of the original document. Remember that the Virtual Keyboard enables you to add special characters. Since it is often hard to decide which Unicode character may be the right one, you may also consult the MUFI website to get more information on this issue. As above, if interested, you can tag the abbreviation and write the expansion as an attribute.
- Unclear
Use this tag when the text can not be transcribed since it is illegible. Highlight the unclear text in the text editor and tag it as “unclear”; you may also add alternatives or suggestions for the illegible word as an attribute of the tag. - Gap
If the text is impossible to read, add the “gap” tag where the illegible text should appear in the text editor. - Blackening
Use this tag to redact sensitive information in the export formats. Typically this is used to hide personal data in a document that is made publicly available. The blackening tag is used in conjunction with the “blackening” region to hide the word or section in the image. For now, the “blackening” region and the advanced export feature to render blackening are available only in Transkribus eXpert.
To ensure accurate training, it is recommended to exclude lines with 'unclear' or 'gap' tags. By doing so, you prevent the model from learning incorrect transcriptions. For more information on this topic, please refer to this article.
Once you have finished tagging your transcriptions, you can download your tags, for example in an Excel or Docx file, as described on the Downloading page. More download options as well as the possibility to search for your tags will be implemented soon. In the meantime, you can use the export and search functions in Transkribus eXpert, as described below.
Next step: Downloading
Transkribus eXpert (deprecated)
Textual tags enable you to enrich your transcriptions by tagging some words (e.g. abbreviations, places, people…) and adding attributes. You can then search for specific tags and export them in different file formats so that you can go on working with them outside of Transkribus.
To manage the textual tags of a collection, open the collection in question and go to the Metadata-Textual tab in the Managing & Tools sections. Flag the “Collection tags” option to see all the tags available in the collection.
If you want to edit the tags linked to the collection, click “Customize” and select “Collections tags”. Here you can add new tags and their attributes to the collection: click on “Create new tag”, type its name and add the properties (if necessary) with the “Add properties” green + button.
To delete a collection tag, select it and click the “Remove” red button. Note, however, that the predefined tags and their properties cannot be deleted: they will always be shown in your collection tags list, even if you are not interested in using them.
With the most right green + button, you can take over the selected tags to the User Tags so that you can use them in every collection. You can do the same the other way around: in the User Tags tab, you can select some tags and take them over to the Collections Tags: in this way, all the users who have access to the collection can use the tags.
All the changes done to the Collection Tags are saved only for the collection in question (the one opened in the background). The other collection users can see and use your newly added or edited tags.
The tagging interface can be found by clicking the “Metadata” tab and then the “Textual” tab.

To add a textual tag, select the text in the Text Editor and afterwards click on the green + button near the tag you want to apply. Alternatively, after having highlighted the text, right-click with your mouse and choose the suitable tag under “All tags”.
In the upper section of the Textual tab, you see the tags present in the transcription of the current page. Clicking on one of them, the image and the Text Editor will automatically jump to the line containing it.
Use the red button here to delete tags: select the tag from the list (press CTRL to select more than one tag at a time) and click the red button. Alternatively, you can delete a tag by highlighting the tagged word or phrase, right-clicking with your mouse and then pressing the “Delete” button. The program will give you two options: “Delete only the highlighted tag” or “Delete all the tags for the current selection”.
Below, there is the “Tag” section: here are listed all the textual tags you can use. You can decide if you want to show all the user tags or only the ones linked to the collection. Near each tag, there there are a green + button and a star button: the first, as explained before, adds a tag to the highlighted text; the star button gives access to advanced options for tagging. In particular, the advanced options enable you to delete or rename all tags of a certain type.
By clicking on the “Customize button”, the Tag configuration window opens up. Here you can customise the textual tags both at the level of user and collection. In more detail, you can:
- Create new tags;
- Delete tags;
- Change the colour with which the tag is displayed;
- Add/modify properties of new and existing tags;
- Add a tag to the list of “Tag Specification” and assign it a shortcut. Shortcuts allow you to speed up the insertion of frequently used tags: select the text and press the shortcut keys to add the tag.
- Add a shortcut relating to the properties of your tags, e.g. for expanding abbreviations or adding a standardised country name to a place tag. Select the tag and type the property content you would like. Then click “Add tag specification”: now your tag and its property will appear in the “Tag Specification” section of the window, and you can add the shortcut you would like to use. Now you can add the tag and its property by simply highlighting the word or phrase in the Text Editor field and then pressing the shortcut.
In the “Tag Configuration” window, predefined tags are shown in italics; customized ones are shown without italicisation.

Lastly, at the bottom of the Textual tab, there is the Properties section, where you can edit the properties of a tag, if it has any.
Textual tags should be tailored to your specific purposes, but in general, we can say that the following ones are particularly useful when working with historical documents:
- Abbreviation:
You can tag the abbreviated word and type the expansion as a property.
There is no right way to deal with abbreviations. Depending on the transcription you want to have in the end, you can adopt one of these approaches: - transcribe the expanded version of the abbreviation directly into the text editor (the neural networks are often able to learn to recognise and use expansions, especially if they appear frequently);
- transcribe the abbreviation using the base characters most similar to the characters written by the writer; you can then tag it and write the expansion as a property;
- transcribe the abbreviation using the Unicode characters, which are near to the special graphemes of the original document. Remember that the Virtual Keyboard enables you to add special characters. Since it is often hard to decide which Unicode character may be the right one, you may consult the MUFI website to get more information on this issue. As above, if interested, you can tag the abbreviation and write the expansion as a property.
- Unclear:
Use this tag when the text can not be transcribed since it is illegible. Highlight the unclear text in the text editor and tag it as “unclear”; you may also add alternatives or suggestions for the illegible word as an attribute of the tag. - Gap:
If the text is impossible to read, add the “gap” tag where the illegible text should appear in the text editor.
- Blackening:
Use this tag to redact sensitive information in the export formats. Typically this is used to hide personal data in a document which is made publicly available. The blackening tag is used in conjunction with the “blackening” region, which must be added with the segmentation tools.
To blacken part of your text in the image window, go to the Canvas menu, use the drop-down menu on the “+…” segmentation element button and select “Blackening”. Use the “Blackening” region to mark the word or section that you want to hide (remember to click the “Item visibility” button on the Main menu and select “Render blackenings” to display the blackened sections on a page). Then, highlight the corresponding word in the Text Editor and select the “Blackening” tag.
In the export of the document, the text will be replaced by asterisks. When you export your document, make sure that “Do blackening” is selected. Please note that in METS and TEI files, the word or phrase is blacked out, but the information behind the blackened section is kept. In other file formats, the text behind the blacked-out section is completely obscured.
Text styles (bold, italic, subscript, superscript, strikethrough, underline…) are added as textual tags. To modify the text style of your text, use the Formatting Bar below the Text Editor.
It is possible to train tags and properties while training an HTR model. The resulting model will both transcribe the document and add the textual tags to the transcription automatically. Read the Model Training page to learn how the training tags feature works.